Showing posts with label 9. SWEETS AND DESSERT RECIPES. Show all posts

Saturday, 24 March 2012

DECONSTRUCTED BAKLAVA RECIPE

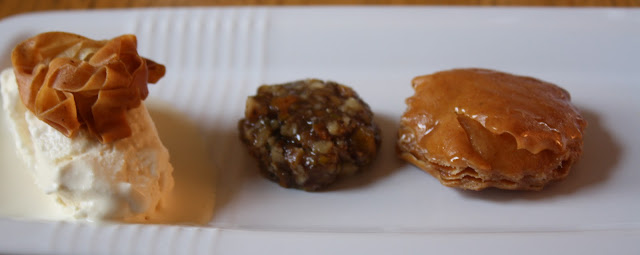
Last brunch club I attempted my first Baklava. I like Baklava but I always find them too sweet to be able to enjoy more than a bite and the syrup coating the crispy filo hurts my teeth. Broken down,  the bits and pieces are a delicious combination of flavour and texture. Savoury nuts mixed with the natural sweetness of honey and crunchy buttery filo pastry. I took apart the baklava and created three elements for a deconstructed dessert for our Middle East London brunch club.

A crunchy filo stack with doughy pistachio and walnuts spiced and sweetened with sugar syrup along with honeycomb ice cream.


Ice cream has been a constant feature in brunch clubs recently with my magical machine creating avocado helado, christmas pudding ice cream and whiskey sour sorbet to name a few. Its my favourite kitchen appliance (apart from maybe my Kenwood kitchen chef). I decided to make an ice cream using the honey element of the Baklava complete with crunchy bits of honeycomb reminisant of hokey pokey ice cream. A flavour Kiwi kids will remember.
< Here are the quite simple instructions to prepare your Bits of Baklava

For the Baklava
16 - 20 servings depending on size
5 sheets Filo pastry
2tbsp butter ( enough to coat the 5 film sheets )
100 g unsalted pistachios
100 g walnuts
1Tbsp honey
1 cup water
1 cup caster sugar


Pre heat the oven to 200c. Start with a baking tray lined with greaseproof paper. On top of this place a sheet of filo, brush with a little melted butter,  repeat with more filo and butter until you have used 5 filo sheets. Cut the filo to your individually desired sizes. I used a circle cutter around 6cm diameter.


Place in a preheated oven for 20 minutes until golden brown. 
When serving Nick poured a little sugar syrup on the film, but this is optional. I prefer it with out.

To make the filling take pistachios and walnuts and add to a food processor with ground cloves and cinnamon. Mix together till the nuts are roughly broken up but not too powdery as you still want bit of bite. 


In a small saucepan add water, sugar and honey, heat until sugar is dissolved and the syrup has thickened. Add the nuts mixture to this syrup, mixing through. The syrup will thicken even more once it cools down. Place in the fridge to cool until you need to plate up. At least a couple of hours. 

For the Honey Ice cream
550g double cream
6 large egg yolks
225 g runny honey
250ml Milk

For the Honey Comb
125g caster sugar
1 Tbsp runny honey
1/4 tsp bicarbonate soda

Method - using an ice cream machine
Make sure the ice cream machine has been chilled for at least 24 hours.


Its a basic custard recipe with the addition of honey. Firstly warm the honey in a sauce pan, add the cream and milk and heat until just before boiling. Stir and watch the liquid doesn't stick, boil or burn. Remove from the heat before taking your attention to the eggs. 


Whisk your eggs, then add the warm custard liquid to the eggs, whisking to combine. 


Return the mixture to the saucepan and over a low heat stir until it starts to thicken. I find the best time to stop this, before you get in to curdling territory, is to watch for the length of time the lines in the custard take to disappear as you move the wooden spoon through it. It won't suddenly become very thick but it will start to slow down. It takes only a few minutes. Transfer the mixture to a container which you can pop in the fridge until it has chilled for a couple of hours.


While your waiting for the custard to cool, make your honeycomb. Line an oven tray with greaseproof paper. In a saucepan add the sugar, honey and 4-5Tbsp of water, bring to the boil. When the mixture has become caramel and honey coloured turn off the heat and add the bicarbonate soda, whisking quickly to combine. As soon as it's combined pour it on to the prepared baking tray and leave to cool and harden.


After a couple of hours you should have cold custard and hard brittle honey comb. I smashed the honeycomb up under a tea towel using a rolling pin and mixed in to to my custard. Pour the custard in to the ice cream machine and churn until it forms smooth ice cream, around 30 minutes. 
You could serve immediately or put the ice cream in a sealed container in the freezer, removing around 10 minutes before you want to serve.


Plating up your Baklava
You can be creative with plating up, making a stack might be nice, I thought sprinkling the nut mixture on the ice cream would be cool. For brunch club went for something simple that we could get out quickly without anything melting.  


Tuesday, 6 December 2011

CHRISTMAS PUDDING ICE CREAM


Plenty of requests for this recipe, I won't lie I found it online here and made it pretty much as per the recipe with a few tweaks. Firstly I used Morgans Spiced rum instead of brandy because I like it better and I didn't soak the fruit for more than a day. I don't like boozy fruit that much, who actually does? I think thats part of the reason people don't like Christmas pudding. I also have an ice cream machine so it was super easy for me.

This ice cream was so yummy if I do say so myself and I will be making it again for Christmas inside a baked alaska! Wonderful flavours & smells of Christmas, the fragrant spices and texture from the fruit with real cranberries for a burst of liquid in your mouth and the bite from the ginger nut biscuits crushed up and mixed through.  More please!

This made about 1 litre of ice cream in my machine


Ingredients
For the boozy fruit
100g of frozen cranberries
150g Packet of mixed fruit -  is used dried cherries, sultanas and apricots
6tbsp Morgans Spiced Rum
2tbsp Rapadura sugar  (could just be brown sugar as well)


For the Ice cream
2 cinnamon sticks
1/4tsp ground nutmeg
1/2tsp ground ginger
1/4tsp caraway seeds
4 whole cloves
1/4 tsp vanilla extract
600ml double cream
3 egg yolks
100g rapadura sugar (again brown is fine)
Half a pack or so of ginger nut biscuits (not sure how many used so use as many you you see fit!)


Method
For the boozy fruit, pop all the fruit, sugar and rum in to a saucepan and heat & stir for a few minutes until the sugar has dissolved. Leave this to cool, then put in to the fridge for a few hours. I know some people like a strong rum flavour and you can leave it for days or weeks and I don't and I left mine half a day which was just fine with me.

Separately prep the ice cream by placing all the spices in a saucepan and heating for a couple of minutes to release the aroma. Add the cream and vanilla and stir with a wooden spoon, bring it to the boil but not too quickly and watch the cream doesn't stick to the pot.
In a separate bowl whisk the egg yolks and sugar then pour the hot cream in to the eggs. Whisk together a minute then pour back in to the saucepan and place on the heat for 5-10 minutes.  Stirring with a wooden spoon, it will thicken a little and is ready when your spoon is coated.

Allow the cream to cool then place in a container in the fridge until its chilled. Around 4 or 5 hours.

Once ready to make the ice cream take the chilled cream mix and push it through a sieve so you don't get any of the spices in your ice cream. Place the sieved cream in your freezing cold and I mean its been chilling for at least 48 hours, ice cream cold box and pop in the machine. It should only take 30 minutes until its smooth creamy ice cream. Those of you without a machine, sorry its slightly more time consuming, you need to keep it in a cold box in the freezer and take it out to stir every hour to ward off those ice crystals until it reaches ice cream consistency.

For me, once I had ice cream I folded through some crushed ginger nut cookies. I strained the boozy fruit and folded that in as well. I didn't want the fruit or cookies to break up any more which is why I chose to fold them in at the end after the machine had mixed the ice cream. Then everything goes in a container in the freezer till it was ready to serve it. Voila!

I served my with warm homemade custard on the side.


Friday, 2 September 2011

DULCHE DE LECHE CHEESECAKE BROWNIE


Hola,

I've been asked if I'd put up the recipe for the dulce de leche cheesecake brownie I made for a birthday party recently. Unfortunately I don't have any photos of the finished cake because it was whisked away before I was able to take any. I did make myself a little mini cupcake shaped one to 'test' and thats the picture above.

Dulce de leche is from South America, generally said to be invented in Argentina or Uruguay. Its a thick caramel spread consistent with condensed milk. Its really sweet and could be used as a sauce in many desserts.... pop it on your ice cream, or pancakes, or toast if you really have a sweet tooth!

I'm really enjoying experimenting with cakes and baking at the moment. The flavours, ingredients, and styles of cooking them, its a brilliant way to learn. As long as you have a basic idea of how something is meant to turn out and understand measurements, vital ingredients and consistency you can get a bit creative, why not its all part of the art of cooking.
For these reasons things don't always go according to plan... for example the pumpkin cookies I made yesterday came out more like whoopie pies so thats exactly what I made them!

As this was also a bit of an experiment I can't be completely accurate with the recipe so I'd say you want to be a confident baker of cakes and cheesecakes, know your oven and go with your gut a bit. I chose to cook this on a higher heat for shorter time in contrast to the peanut butter cheese cake I made a few weeks ago which was a very low heat for about twice as long. I was much happy with how the peanut butter cheesecake turned out. Also I think because you are baking something with a thick base, the brownie forms a kind of barrier where the cheesecake takes longer to cook in the centre. Certainly it took longer than I thought.

I used the instructions from my Hummingbird Bakery raspberry cheesecake brownie for the brownie part and the cheesecake I just made like any other one and added the dulche de de leche in to the mixture and as a topping.
I cooked this on 170c for about 1 hour..  which is about 20 minutes more than the hummingbird recipe said (which I've made before with success).. it might have been my oven but it just hadn't cooked the cheesecake through to the centre in at 40 minutes. Could also have been ratio of brownie to cheesecake or size of my tin, or the constancy of my cheesecake batter.

But in the end I've been told it was tasty.. very very tasty and my mini version above was perfect. If you aren't really in to sweet things, stay away!

Dulce De Leche Cheesecake Brownie

Ingredients for the brownie
200g dark chocolate
200g unsalted butter
250g icing sugar
3 eggs
110g plain flour

Ingredients for the cheesecake
400g cream cheese
2 eggs
1/2 cup sour cream
3/4 cup granulated sugar
3 tbsp Dulche de leche

For the topping
1-2 cups sour cream (to desired thickness)
2 tbsp dulche de leche

Preheat over to 170c and grease a 9 inch spring form baking tin.

Begin by making the brownie.
Place the chocolate in a heat proof bowl over a pan of simmering water making sure the bowl doesn't actually touch the water. Let the chocolate melt whilst stirring then turn off the heat.
Cream the butter and sugar until smooth and well mixed. I used brute force and the power of the stinking hot Spanish weather to soften the butter and mix it. But you could use a cake mixer or hand mixer if you are in London and don't have the humidity to help you.

Now add the eggs one at a time, mixing well between each addition. Lastly add the flour a little at a time and mix for a couple of minutes until everything is incorporated and lovely and smooth.

If you want, add some crushed up walnuts to the brownie mix...  yummy texture and a nice surprise which I always like.

Pour this in to your greased cake tin and smooth out with a spatula. Leave this whilst you make the cheesecake batter.

When making the cheese cake I opted to use sour cream but you could use normal cream as well. Various recipes use either or.. I assume the sour cream takes away a little of the sweetness and I thought that would be a good thing considering I was adding the mega rich dulce de leche.

Whisk the cream cheese until smooth and softened, add the eggs one at a time, mixing each one. Add the sour cream and sugar to this and yes, you guessed it, mix, mix, mix


At this point I added about 2 tablespoons of the dulche de leche. Its rather thick, use a whisk and try and break it up a bit, its nice if there are some swirls throughout the mixture, it will look pretty.

The mixture can now be poured over top of the brownie then the tin can be placed in the oven middle rack.

At 170 degrees celsius I cooked mine for an hour. About 10 minutes before the end take it out, make sure its set firmly on top so you can sit the sour cream on top.  Then add more dulche de leche which I spread with a fork to make a pattern.  Then I pop it back in the oven for the last 10 minutes.
The cheesecake should be a little golden, fairly dry when doing the insert a skewer test, firm to touch but its still going to be a little wobbly in the middle. Practice makes perfect with these. After its done it should go in to the fridge for at least 4 hours or ideally over night to set properly.

Thats it!

A note on the topping sour cream/dulche de leche topping:  to be honest it didn't work as well as I'd have liked it. It would have been better with a lot more sour cream as a canvas I think, probably 2 cups worth and I didn't have that much! Also you could just spread dulche de leche as a sauce over the entire cake once cooked and it would melt nicely in to a gooey sauce.

I had great biceps after making this, which means baking delicious cakes is good exercise, therefore you should do it more!


Sunday, 7 August 2011

PEANUT BUTTER CHEESECAKE


Hola amigos!

As you know I've been loving baking in Barcelona, having the time to research and experiment with my desserts and cakes has been so much fun. I love introducing my new friends here to my style of food and especially my love of all things sweet. This past weekend we had a fiesta de cenar, a dinner party at home with a variety of tapas, salads, dips, soups, home made sushi and one delicious dessert. Baked peanut butter cheesecake with chocolate honey sauce. *drools*

I was scouring my favourite foody website tastespotting for delicious sweet treats and I came across a couple cheesecake recipes with a twist. I used elements from a few different recipes to create my postre and I rate this as my all time favourite and best looking dessert yet. It was perfect in every way and I couldn't have been prouder.

Everything in this cake is bad for you, but its so easy to eat so make sure there are lots of hungry mouths otherwise you might eat it all!


Ingredients


For the base
1 cup crushed chocolate chip cookies (approximately!)
1 cup crushed vanilla cream filled wafers
55g butter, melted

For the filling
250 grams cream cheese
1/2 cup fresh cream
4 eggs
1 cup peanut butter
1 cup brown sugar
3/4 cup extra vanilla wafers (optional)

For the sauce
170g milk chocolate (your which ever you like best!)
1 tbsp honey
1/4 cup fresh cream

Crushed almonds for garnishing


Method
Pre heat the oven to 135c or 275f and prepare a spring form tin (mine was 9 inches) with a good slathering of butter all over, coating the base and sides.

Take your cookies and wafers and add to a blender to create the crumbly base. There's no problem with using your hands or smashing under a paper towel if you don't have a blender or food processor. In a bowl add the crumbs and butter and mix together with your hands. You'll see them all sticking together and you'll be able to spread this out on to the bottom of your spring form tin and create the cake base.

Now for the filling, most recipes say to use a cake mixer or you could use a hand mixer. Personally I don't have either here in Barcelona, I mixed this all by hand and my biceps are reaping the benefits of the work out.

Put the cream cheese in to a large mixing bowl and whisk for a couple minutes until smooth and creamy. To this add the eggs one at a time mixing between each one, then the cream and sugar mixing again for a couple of minutes.

Add the peanut butter, its quite hard to incorporate at first but you'll need to mix it until its dissolved in to the mixture and its all a lovely smooth consistency. Use a whisk, it helps. Now TASTE!  YUMMY?  GOOD! At this stage I decided to add a bit of texture and bite so I took some of the remaining vanilla wafers, broke these in to bite size pieces and folded them in to the mixture.

Pour this lovely filling in to the tin covering the base and smooth out the top. Pop in to the oven, on the middle shelf and cook for 1 1/2 hours on the low heat.

The cake should come out golden on the top, slightly firm to the touch and if its all good it should be starting to come away around the sides of the tin. This should be popped in to the fridge for at least 4 hours, I left mine over night.

Once your ready to eat it you can prepare the chocolate sauce. In a sauce pan heat the cream until just before boiling point, be careful it doesn't stick to the base then turn off the gas or element. Roughly chop the chocolate and add to the hot cream, cover with a lid and let it melt in to the cream for a few minutes. Mix it all together along with the honey and your done.

Spread the sauce out over the cake and sprinkle with some crushed almonds. Pistachios would be lovely as well.


And thats it, relatively simple and makes a wonderful dessert / breakfast / midnight snack.

Enjoy
x


Wednesday, 8 June 2011

SANGRIA CUPCAKES


Hola! 
If you didn't think cupcakes existed in Barcelona, think again. I've already managed to find the amazing Lolita Bakery in Borne last week, sampled 2 of their fare and as well as that purchased the gorgeous cupcake cases featured in this post (although kind of hard to see the design with the bright red cupcakes!) I've found baking tins, red food colouring and all my baking ingredients. I was feeling creative and wanting to making something with a Spanish twist, the first thing that came to my mind, Sangria! Fruity, sweet and boozy! Perfect.

So I started with vanilla cupcakes and knew I needed to add red wine, orange, lemon and cinnamon for a basic Sangria flavour. I made a decision to add cherries as well to give the wine more sweetness. 

I made a cherry jus by reducing the cherries down with the red wine, adding the orange and lemon zest and juice as well as sugar and cinnamon to this mixture. It smelt like mulled wine and turned in to  something like a cherry jam in the end which is what I added to my vanilla cupcake mixture. 

This is very rough as I was pretty much tasting as I went. I think possibly the vanilla (I used fresh from a pod) was a bit over powering and I could have used more red wine. But thats my preference, I like to taste the specific flavours and as you know I like to taste the alcohol in my cocktail cupcakes as well so tend to add more than most recipes say :)

Ingredients
1/2 cup red wine (something sweet and fruity)
200g cherries, destoned and chopped
1 tsp each of orange zest & juice
1 tsp each of lemon zest & juice
1 tsp cinnamon
200g white sugar
190g plain flour
1 1/2 tsp baking powder
pinch of salt
1/2 cup butter, melted 

2 eggs
1/4 cup milk
1/2 tsp vanilla ( I used vanilla pods, but essence will be fine )
red food colouring

Buttercream frosting
1/2 cup butter
250g icing sugar
1tsp red wine 

Method
Preheat the oven to 180c
In a pan put the red wine, cherries, orange & lemon zest and juice, cinnamon and 50 grams of the sugar. Simmer for about 20 minutes, the mixture will reduce and thicken till its almost like jam. It tastes pretty sweet at this stage but will perfect when you add it to the rest of the mixture. Feel free to taste and add additional ingredients if you prefer. i.e more wine or citrus.

Pour the mixture in to a bowl and pop it in the fridge to cool down for another 20 min. At this stage you should mix the eggs, butter, vanilla and rest of the sugar together. 
Then in another bowl mix the flour, baking powder & salt. 

Combine the dry ingredients in to the egg mix alternating with the milk. Once this is all combined add the red wine and cherry jus you made earlier. Its going to go a brown colour so I added some red food colouring powder I found at Parami in Barcelona. It was intense, I used maybe a half a teaspoon and it went this very rich red colour. Beautiful.                                                                                    
Taste the cupcake batter!!  I always add more of what I think it needs. I think I added a drop more wine and lemon zest because the vanilla pod flavour was dominating. But be careful with the liquid you don't want to mess up the consistency. 

Fill the cupcake cases 3/4 full and you should have 10-12 cupcakes depending on size your making. 
Bake for 20 minutes until the tops are bouncy and a knife comes out of the cake clean. 
Once you've taken them out of the oven let cool for 5 minutes before popping out of the cake tin on to a wire cooling rack and leaving to cool completely before decorating them.


For your frosting, cream the butter and add the icing sugar, mix well. I added a tsp of red wine and really gently mixed it in to create a marbled effect. 


And thats it, decorate the cupcakes generously with the buttercream and add what you desire as a topping. I used lemon and orange zest and a cherry.

 Enjoy your cupcakes and happy summer everyone!


Friday, 27 May 2011

WHITE CHOCOLATE ROSE & PISTACHIO CUPCAKES


By popular demand here is the recipe for what I think are the the most delicious cupcakes I've ever tasted. White chocolate, pistachio and rosewater flavoured cake with white chocolate icing sprinkled with pistachio and rose turkish delight. Epic. Amazing when I ate it just freshly baked and decorated. I was blown away, I rate it my best cupcake ever and I found this recipe whilst I was in New Zealand in the NZ Womans Weekly magazine.

This recipe makes 24 cupcakes ( I halved it and used the larger muffin cases so it made 10 in my batch)

Ingredients

190g butter
115g white chocolate
1 1/2 cups caster sugar
2/3 cup milk
1 cup plain flour
2/3 cup self raising flour
1/2 tsp vanilla bean paste
1 to 2 eggs, lightly beaten  ( I used 2)
80g roasted unsalted pistachios finely ground
2 tbsp rose water essence

Topping
115g white chocolate melted
6 cubes of turkish delight diced in to smaller pieces
Extra pistachios, chopped

Method


Preheat oven to 150c.
Combine the butter, white chocolate, sugar and milk in a bowl over a pot of gently boiling water until the sugar is dissolved and the chocolate and butter have melted. Remove from the heat.
Sift the fours together in a separate bowl then combine with the melted liquid.
Add the whisked eggs, vanilla bean paste, ground pistachios and rose water essence. Stir to combine.

Pour mixture in to the cupcake cases and bake for 20-25 minutes.

I like to fill around 3/4 full so the cake has room to rise and for me to add the icing. Thats why I use the larger muffin cases. I baked mine for 23 minutes exactly.

I think these are out of this world. Decorating them with a tablespoon or so of the melted white chocolate which should be pretty rough, and sprinkle the pistachios and turkish delight to suit you. It looks so pretty and tastes better than you imagine.


Wednesday, 25 May 2011

ROLLED PAVLOVA WITH LEMON CURD AND MACERATED STRAWBERRIES

Recently my mum made me a rolled pavlova. As a kiwi born and bread girl I've had my fair share of Pavlova, its a staple at Christmas time and indeed pretty much any special occasion. Growing up we always had a pav at Christmas time which my Nana would make and decorate with strawberries and kiwifruit. I love the layers of crunchy, chewy, fluffy meringue. I hadn't heard of a rolled variety before and I was intrigued.

Now lets not get in to any arguments on when and where the Pavlova was invented. Its a very popular dessert in both New Zealand and Australia both claiming ownership. Why can't we just share?Australians like it with passionfruit, we prefer kiwi. Plenty of Pavlova for all and anyway its named after a Russian ballet dancer, Anna Pavlova so no doubt they like it as well. Wikipedia says it was named after her when she toured EITHER Australia or New Zealand in the 1920s and that Formal research puts the originality of the dessert to a chef from Wellington, New Zealand. Wikipedias words, not mine, read it for yourself here.

Mum made me one on my last night in Christchurch, it was filled with cream, natural yoghurt, lemon curd and topped with macerated strawberries.
The trick to rolling it without it cracking mum said was to lay the meringue out really thinly and not to cook it for very long.
I loved the soft, airy melt in your mouth consistency that this style of preparation achieved.

The recipe will serve around 8 to 10 people.

Ingredients

Meringue
4 egg whites
225g caster sugar
1 tsp cornflour

Filling
250ml cream
3 Tbsp greek yoghurt
3 Tbsp lemon curd

Topping
1 punnet strawberries
1 Tbsp caster sugar
1 tsp balsamic vinegar

Method

Pre heat oven to 190c
Line a baking tray with grease proof paper.
Whisk egg whites until firm peaks form then add sugar and sifted cornflour, continue whisking until thick and glossy.
Pour the meringue mixture out on to the grease proof paper and spread thinly, around a couple of centre metres thick.
Bake for 8 minutes until light brown on top and the meringue is spongy to touch.
Allow it to cool then turn the baking tray over on to some more grease proof paper or a clean tea towel and pull the paper away from the bottom of the pavlova. Dust with icing sugar.

Whisk together the cream, yoghurt and lemon curd, spread the filling evenly across the whole meringue. Now using the tea towel to start, slowly start to roll the meringue inwards like a swiss roll with the edge ending up at the bottom.
Sprinkle sugar and balsamic on the strawberries to coat them, leaving them for about 30 minutes to macerate (soften and marinate) before serving with the rolled Pavlova.


YUM YUM!


Friday, 22 April 2011

SAFFRON AND PISTACHIO FROZEN YOGHURT

You might have read my post on the Spanish dinner we had last Saturday and the frozen yoghurt I made. Saffron and Pistachio helado. It was so delicious I thought I should post a recipe for you all. I used an ice cream machine to mix it, although it never seems to stay cold enough to take away the need to pop it in the freezer sporadically and stir by hand. Im still getting used to it.

Saffron is widely used in Spanish food, paella for one and pistachio is a very popular helado (Spanish for Icecream) flavour. The two combinations work well together.
Initially I was going to make this ice cream but in researching I found a recipe using hung yoghurt. I had never heard of this before, sounded like a bit of hard work as well. You need muslin cloth and to strain yoghurt over night to loose any excess liquid and retain the yoghurt thats left for the recipe.
Its apparently a good susitutute for dishes with goats cheese. I thought I'd try it with goats cheese but it was hard to find and its quite expensive considering the amount I'd need. Wouldn't you know it, I was in the mediterranean supermarket on the high street and they had strained (or hung) yoghurt in a plastic container already done for me. Perfect.

My recipe was slightly too large for the ice cream machine when I made it, it over flowed a little and I siphoned of a little in to a seperate container in the freezer. (A little went in my belly too..)

If you have an ice cream machine you should put the freezer box in the freezer the night before, or longer if possible so its covered in iceicles and sets the ice cream properly when in the machine. Mine was in there around 12 hours but I don't think even that was long enough to set the icecream outside of the freezer. As it mixes it starts to set and then melt again. Pop it in the freezer for a bit if you need to.


Heres the recipe I made and some tips for this frozen yoghurt filled with flavour and texture.

Ingredients

625 grams of strained yoghurt
3 cups double cream
3 cup of icing (powdered) sugar
Generous pinch of saffron
1/2 cup pistachios -  unsalted or washed.
Dash of rose water essence (optional)

Method

First take 1/2 cup of the cream and add the saffron, either pop in the microwave for 30 secs or if like me you don't have one on the stove top for about 3-5 minutes. It shouldn't boil, just heat through a little.
Then leave to cool and for the saffron to infuse. I left mine over night in the fridge.

Beat the strained yoghurt  -  now strained yoghurt pretty much had the consistancy I needed, like nearly whipped cream, it held soft peaks. I don't know if this is the same with hung yoghurt made yourself, so you might need to beat that a bit longer. Add the remainder of the cream as well as the saffron cream. Mix together.

Add the icing sugar now and taste. Make sure its delicious before you pop it in to the freezer box. Go with your gut and add what you think it needs. Rose water is a nice addition as well  -  we often do saffron yoghurt with rosewater and pistachio at our brunch club. I added a teaspoon of rosewater essence, its very strong, you need to be careful. But I didn't really taste it. Might want to add another tsp for this amount of ice cream. Again, do it carefully and taste as you go.

Leave the pistachios  -  you'll add them later after all the mixing has happened.

Pour the yoghurt and cream mix in to the freezer box and either pop in the freezer or in to the ice cream machine. The main thing you need to do with ice cream is stop ice crystals forming as it sets, constant mixing stops this. Takes around 4 hours of mixing, either by the machine or by hand. If you need to do this by hand, you'll need to take it out of the freezer and beat it well every hour to stop those crystals forming.

Once this process is over you should have successfully warded off the ice crystals and you can add the pistachios (shelled, washed, chopped roughly), mix through then put the box back in the freezer for another 4 hours.

I find conventional freezers are too cold and do tend to make the ice cream/ frozen yoghurt too hard when it comes to serving. Those boxes don't thaw out quickly either so do keep an eye on this. This whole procress took me all day (I'd done the saffron cream the night before)

The end product was really YUMMY!
I do want to try again and keep a really close eye on how frozen it gets, I would have liked it smoother. It tasted so nice I was eatting it during each stage of the process.
This amount will feed 12-15 people so you could easily halve it. Maybe do it in two batches if you have time.


Tuesday, 22 March 2011

COCKTAIL CUPCAKES : KIR ROYALE / BLUE VELVET CUPCAKE RECIPE

Blue velvet cupcakes were one of the first recipes we tried when we first started baking these mini sweet delights. The moist centre, sweet blueberry flavour. Not as rich as chocolate or vanilla cupcakes. The natural fruit sugars sweeten the cupcake perfectly. We got our original blue velvet inspiration from the totally awesome Catty Life. She rocks! The Blue Velvet cupcake was an easy choice for a base cupcake recipe to sell at our Carousel market. We of course wanted a cocktail theme so we went for a Kir Royale which with some champagne and cassis flavours really worked well with the fresh blueberries.


There are a few Kir royale recipes out there - but most seem to put champagne in the cake -  we chose to put creme de cassis in with the blueberry batter and as with the cocktail topped it off with sweet champagne frosting.


Kir Royale Cupcake Recipe (Adapted from Catty Life's Blue Velvet cupcakes with a twist: blueberry cassis batter and champagne cream cheese frosting!)


Ingredients

60grams unsalted butter
150grams caster sugar
1 egg
100 grams fresh blueberries, blended
extra blueberries for cupcakes and decoration
10mL blue food colouring
30ml Creme de cassis
1/2 teaspoon vanilla extract
100mL buttermilk or natural yoghurt
150grams plain flour
1/2 teaspoon salt
1/2 teaspoon bicarbonate of soda
1 1/2 teaspoon white wine vinegar
Cream Cheese Champagne Frosting:
350grams icing sugar, sifted
50grams unsalted butter (at room temperature)
125grams cream cheese, cold
5 ml vanilla
50ml champagne / prosecco 
Method:

Prepare a 24-hole mini muffin tray, lined with cupcake cases.

Preheat oven to 170°C/325°F (Gas 3).

Put the butter and sugar in a bowl and beat on a medium speed with an electric whisk until light and fluffy and well mixed.


Turn the mixer up to high speed, slowly add the egg and beat until everything is well incorporated.

In a separate bowl, mix together blended blueberries, blue food colouring, vanilla extract and creme de cassis.

Add to the butter mixture and mix thoroughly until everything is combined and coloured (scrape any unmixed ingredients from the side of the bowl with a rubber spatula).

Turn the mixer down to a slow speed and add half the buttermilk (or natural yoghurt). Beat until well mixed, then add half the flour and beat until everything is well incorporated. Repeat this process until all the buttermilk and flour have been added.

Turn the mixer up to high speed and beat until you have a smooth even mixture.

Turn the mixer down to low speed and add salt, bicarbonate of soda and vinegar. Beat until well mixed, then turn up the speed again and beat for a couple more minutes.

Spoon the mixture into the cases until 2/3 full. Drop in 2 blueberries per cupcake and bake in the preheated oven for 12 minutes for mini cupcake, 20 minutes for normal cupcakes. 

A skewer inserted in the centre should come out clean. Leave the cupcakes to slightly cool in the tray before removing to wire cooling rack to cool completely.

When cupcakes are cooling make your champagne frosting. 

Cream cheese champagne frosting:
Beat the icing sugar and butter together with an electric mixer. Add champagne and beat in the cream cheese until it is well mixed (2-3 minutes) .

Some happy velveteers at our brunch club:


Monday, 14 March 2011

DRINK SHOP & DO

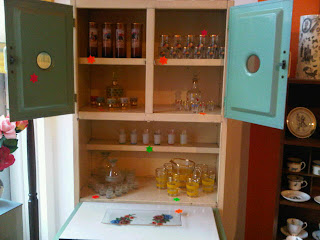
For the Ladies who like to lunch out there I went to the cutest new shop/cafĂ© in Kings Cross this weekend, Drink Shop & Do and I’m slightly envious I hadn’t thought of this myself.  A delightful mix of afternoon tea, vintage shopping and craft space.
Situated on Caledonian Rd, near Kings Cross Station this place is perfectly on trend with the ever popular Vintage fad that is here to stay in London.

You enter into the ye 'olde sweet shop, hard candy, sherbert, licorice and lollies! Opposite a wonderful array of vintage and vintage inspired tea sets, furniture, tea towels, jewellery, cards, art work, record players, board games and more. It was unbelievably hard to to buy everything in this shop.

Out the back the 50’s style diner come cocktail bar surrounded with a mish mash of furniture, tapestries, cake stands, cucumber sandwiches, scotch eggs, and tea pots.
Decorative plates adorn the walls (all for sale, as well as a lot of the furniture and art), people playing scrabble, cards, knitting and generally enjoying the atmosphere.

To Drink I had a Ruby Shoes cocktail, orange vodka, cherry sour, raspberry liqueur, lime & ginger beer, it was like a liquid lolly. As well as lemon drizzle cake and later to accompany my scrabble game a pot of tea. 
The space is quite large, but very popular, book a table! We were lucky to get one and shared with a couple of guys looking for a challenge at scrabble.
Drink Shop and Do is open Tuesday - Sunday late and has ever changing craft & games themes including crochet, drawing, vintage hair dos and hat making. Its also available for private parties! (YAY)
The cocktail list is to die for the food is ‘high tea’ cakes, sandwiches, sweet & savoury tarts.

This could be my perfect Sunday hangout.

5 Gourmet Lovers Hearts!
♥♥♥♥♥
Drink, Shop & Do
9 Caledonian Road, London, N1 9DX.
Tuesday to Saturday 12–11pm
Sunday 12–8pm

E:
mail@drinkshopdo.com
T: 0203 343 9138